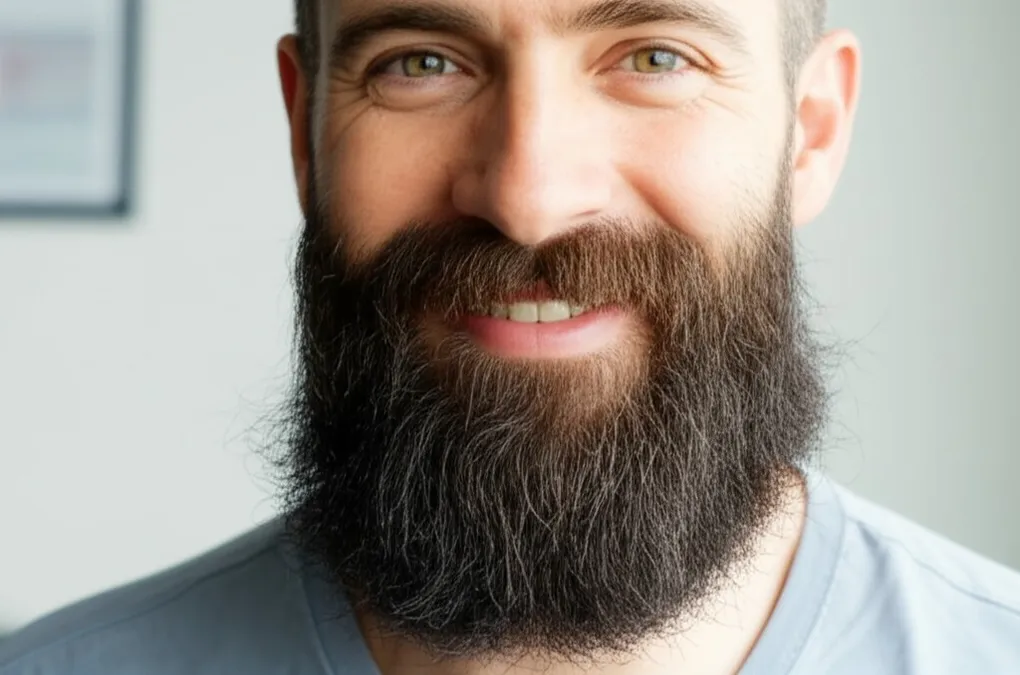
The camera doesn’t just capture your beard—it reveals every detail, imperfection, and styling choice with unforgiving clarity. That stray hair invisible to casual observers becomes prominent in photos. The subtle product buildup you ignore daily shows clearly on camera. And the lighting that seems fine to your eyes creates harsh shadows or unflattering highlights in images.
Holiday season means constant photography—professional family portraits, office party snapshots, social media posts, and those spontaneous moments that become treasured memories. Your beard appears in all of them, either enhancing your appearance or undermining it. The difference between photogenic excellence and disappointing results comes down to understanding how cameras see beards differently than human eyes do.
This comprehensive guide provides professional techniques for camera-ready beard grooming, ensuring every holiday photo showcases your facial hair at its absolute best.
Understanding Camera vs. Eye Perception
Human vision and camera sensors process your beard fundamentally differently. Understanding these differences allows you to groom specifically for photographic success rather than just mirror approval.
Texture amplification: Cameras emphasize texture far more than human eyes. Rough, dry beard hair that looks acceptable in person appears significantly rougher in photos. Conversely, well-conditioned, smooth hair photographically gorgeous even if the difference seems subtle in person. This means photo preparation demands extra attention to conditioning and smoothing.
Lighting sensitivity: Your eyes continuously adjust to varying light conditions, but cameras capture a single moment with specific lighting. Beard areas that appear fine under normal lighting may show unexpected shadows, highlights, or color variations in photographs. Testing your appearance under photo-similar lighting conditions before important shoots prevents disappointing surprises.
Detail capture: Professional cameras and even modern smartphones capture extraordinary detail. Flyaway hairs, uneven trim lines, patchy areas, or product residue that you barely notice become clearly visible in high-resolution images. Photo-ready grooming requires precision beyond everyday standards.
Color accuracy: Cameras often render beard color differently than your eye perceives it. Natural reddish or blonde tones may photograph differently than they appear in mirrors. Gray hairs may show more prominently. Understanding how your specific beard photographs helps you prepare appropriately. Our color and gray beard guide provides insights into how different tones appear in photos.
Pre-Photo Preparation Timeline
Professional results require systematic preparation, not emergency grooming minutes before the camera appears.
72 hours before: If significant trimming or shape adjustment is needed, do it now rather than the day of photography. This allows time to make corrections if needed and lets your beard settle into its new shape naturally. Major changes executed the day of photos create stress and risk error.
48 hours before: Deep conditioning treatment to maximize hair quality and softness. This timing allows conditioning benefits to fully develop while ensuring you don’t look overly oily or product-heavy in photos. The treatment’s effects peak around 24-48 hours after application.
24 hours before: Minor trim refinements, detailed edge work, and addressing any individual hairs that need attention. This timing is close enough to photo day that your work stays fresh but far enough out that minor irritation or redness can fade before camera time.
2-4 hours before: Final shower and standard grooming routine. Apply products with enough time for full absorption before photos. Freshly applied oil or balm can create unwanted shine or look greasy on camera if not given adequate absorption time.
30 minutes before: Final check, touch-ups, and styling refinements. This is when you address any last-minute issues discovered during lighting tests and ensure every detail is perfect. Our working professional’s grooming guide includes techniques for rapid final refinements.
Product Selection for Photography
Not all grooming products photograph equally well. Choose specifically for camera-readiness.
Matte-finish products: For most photography, products creating matte finishes photograph better than those adding shine. Excessive shine can create hot spots in photos where light reflects too strongly. Unless you specifically want a polished, shiny look, choose matte-finish balms and waxes.
Light oil application: Oil is essential for beard health and appearance, but heavy application photographs poorly, creating greasy-looking results. Apply oil 2-4 hours before photography, using lighter amounts than your normal routine. Focus on absorption rather than surface coating.
Powder products: Volumizing powders or dry shampoos can add texture and reduce shine for photography. These products work particularly well for creating fuller appearance and eliminating unwanted gleam without the weight of traditional styling products.
Color enhancers: If using temporary color products to even out beard tone or enhance darkness, test extensively before important photography. These products can photograph unnaturally if not applied skillfully. Always choose colors slightly lighter than seems ideal—they typically darken in photographs.
Styling Techniques for Cameras
How you style your beard for photos differs from everyday approaches.
Directional consistency: Ensure all beard hair flows in consistent directions with no random patches going contrary ways. Cameras emphasize these inconsistencies that you might not notice in mirrors. Use combs and brushes to create uniform hair direction throughout your beard.
Edge definition: Crisp, well-defined edges photograph dramatically better than soft or fuzzy boundaries. Take extra time ensuring your cheek lines, neck lines, and mustache edges are precisely defined. These sharp lines create visual impact and photographic clarity.
Strategic volumizing: Position your beard’s fullest sections where they’ll photograph best. This often means creating slightly more volume at your jaw line and less at your neck to optimize facial structure appearance in photos. Strategic brushing and product placement control where volume appears.
Flyaway elimination: Individual hairs sticking out from your overall beard shape draw disproportionate attention in photos. Use light hairspray, additional balm, or simply careful trimming to eliminate these visual distractions before camera time.
Lighting Considerations
Lighting makes or breaks beard photography. Understanding and working with light dramatically improves results.
Natural light advantages: Whenever possible, photograph in natural light, particularly the soft light of golden hour (shortly after sunrise or before sunset). Natural light shows beard color and texture most accurately while minimizing harsh shadows. Position yourself with light slightly to one side rather than directly in front or behind.
Avoiding overhead lighting: Harsh overhead lights create unflattering shadows in your beard, particularly under your chin and around your neck. If shooting indoors, try to position yourself where light comes from eye level or slightly above rather than directly overhead.
Flash photography: Flash can create unnatural shine and harsh shadows. If flash is necessary, try to ensure it’s diffused rather than direct. Many phone cameras allow you to disable flash—use this option when adequate ambient light exists, even if it means slightly longer exposure times.
Testing lighting: Before important photo sessions, test how your beard appears under the expected lighting conditions. Take sample photos and examine them critically. What looks great in your bathroom mirror might photograph poorly under party venue lighting.
Color and Contrast Management
Your beard’s appearance in photos depends significantly on color contrast and management.
Background considerations: Your beard’s visual impact changes dramatically based on background colors. Dark beards pop against light backgrounds but may disappear against dark ones. Consider wearing clothing colors that create appropriate contrast—light shirts for dark beards, darker shirts for lighter beards.
Skin tone balance: The contrast between your beard and your skin affects photo aesthetics. Ensure your beard’s edges blend appropriately with skin tone rather than creating harsh color breaks. This might mean slightly softening extreme edge lines or using light product application at beard boundaries.
Gray hair strategy: Gray hairs can either enhance or undermine your photographic appearance depending on distribution. Evenly distributed gray photographs distinguished and attractive. Randomly scattered gray looks unkempt. Consider whether your gray pattern photographs well or whether temporary color enhancement might help.
Avoiding color casts: Some lighting conditions create color casts (orange, blue, green tints) that affect how beard color appears in photos. Professional photographers correct these in post-processing, but for casual photography, be aware of how different light sources affect your beard’s apparent color.
Face Shape and Beard Photography
Strategic beard styling for photography accounts for your specific face shape and how cameras capture it.
Elongating round faces: If you have a rounder face, style your beard with more length at the chin and less bulk at the sides. This creates vertical lines that elongate your face in photos. Avoid too much side volume which emphasizes roundness.
Balancing long faces: For longer, narrower faces, create more horizontal volume in your beard. Fuller sides and less dramatic chin length help balance facial proportions in photographs.
Strengthening weak jaw lines: If your natural jaw line is less defined, style your beard to create the appearance of stronger structure. This often means keeping your lower beard fuller while maintaining clean, defined edge lines that suggest jaw structure.
Minimizing double chins: Strategic neck line placement and careful beard trimming at the neck can minimize double chin appearance in photos. Keep your neck line slightly higher and ensure beard growth doesn’t extend too far down your neck, which can create unflattering fullness in photographs.
Professional Photography Sessions
Formal photography sessions (family portraits, professional headshots) demand enhanced preparation.
Photographer consultation: Discuss your beard with the photographer beforehand if possible. Professional photographers have extensive experience with how facial hair photographs and can provide specific guidance for their lighting setup and shooting style.
Multiple styling options: Consider bringing touch-up supplies to the session, allowing slight adjustments based on how your initial shots appear. A small comb, extra product, and scissors for emergency trim adjustments can save a session if initial results aren’t ideal.
Posing considerations: Your beard’s appearance changes dramatically based on head position and angle. Work with your photographer to identify angles that show your beard most favorably. Small changes in chin position or head tilt can significantly affect results. Check our beard shaping mastery guide for understanding how angles affect facial hair appearance.
Time allowances: Don’t schedule photography sessions immediately after work or rushed activities. Allow time to refresh your appearance, address any issues that developed during the day, and ensure you look your absolute best.
Smartphone Photography Optimization
Most holiday photos happen on smartphones, not professional cameras. Optimize for mobile photography specifically.
Portrait mode benefits: Modern smartphone portrait modes create depth-of-field effects that can make beard details pop while softly blurring backgrounds. This effect draws attention to facial hair and creates more professional-looking results.
Self-facing camera limitations: Front-facing smartphone cameras are typically lower quality than rear cameras. For important photos, use the rear camera with timer or remote shutter when possible. The quality difference can be substantial.
Photo editing apps: Learn basic mobile photo editing to enhance beard appearance in final images. Small adjustments to contrast, clarity, or shadows can significantly improve how your beard appears without creating obviously edited results.
Lighting apps: Several smartphone apps help you assess lighting quality and direction before shooting. These tools can help you position yourself optimally for natural light photography.
Group Photo Strategies
Holiday group photos present unique challenges for maintaining beard excellence.
Positioning considerations: In group photos, position yourself where lighting is favorable and you have space to ensure your beard isn’t obscured or squished against others. End positions often allow better individual visibility than middle placements in large groups.
Height adjustments: If you’re in tiered positioning (standing vs. sitting), consider how your beard will appear from the camera angle. What looks good straight-on may appear different from above or below. Slight chin adjustments can optimize appearance.
Consistency across shots: Group photos typically involve multiple takes. Maintain your beard’s styling and position consistently across all shots so you look good in whichever final image is chosen.
Candid Photography Readiness
Holiday seasons include significant candid photography. While you can’t prepare for every spontaneous shot, strategies help you stay photo-ready.
Baseline excellence: Maintain high grooming standards throughout events, not just for known photo moments. This ensures even surprise candid shots capture you looking well-groomed.
Periodic checks: Excuse yourself to restrooms periodically during parties or gatherings to check your beard’s condition. Quick touch-ups take seconds but prevent having food in your beard or wild flyaway hairs in multiple candid shots.
Eating and drinking awareness: Be mindful of how food and beverages might affect your beard. Use napkins proactively, drink with straws when appropriate, and choose beard-friendly foods at events with significant photography.
Post-Photography Review
After important photo sessions, review results critically to improve future photography preparation.
Lighting analysis: Examine how different lighting conditions affected your beard’s appearance. Which situations created the best results? Where did lighting cause problems? Use this knowledge to guide future photo positioning and timing.
Product performance: Did your chosen products photograph well? Any unwanted shine or greasy appearance? Insufficient hold creating flyaway hairs? Adjust your product selection for future photography based on these results.
Styling effectiveness: Did your pre-photo styling choices work well? Any areas you’d approach differently next time? Building knowledge about what works photographically improves results over time.
Angle awareness: Note which angles and head positions created the most flattering beard presentation. This self-knowledge allows you to naturally position yourself optimally in future photography.
Emergency Pre-Photo Corrections
Sometimes photo opportunities arise without adequate preparation time. Emergency protocols can save these situations.
Rapid cleaning: If you’ve got five minutes, focus on removing any debris, finger-combing beard into neat appearance, and addressing the most obvious flyaway hairs. Perfect styling isn’t possible, but obvious problems can be fixed quickly.
Oil blotting: If your beard looks too shiny or greasy, blotting papers or even clean paper napkins can absorb excess oil quickly. This won’t perfect your appearance but reduces problematic shine for better photos.
Strategic positioning: When you can’t perfect your grooming, perfect your positioning. Choose angles, lighting, and distances from the camera that minimize any issues while emphasizing your beard’s better aspects.
Confidence projection: Sometimes accepting your beard’s current state and projecting confidence creates better results than obviously stressed emergency grooming. Relaxed, confident expressions photograph better than tense self-consciousness about appearance.
Long-Term Photo-Readiness Strategy
Rather than preparing separately for each photo session, build photo-readiness into your regular routine.
Consistent excellence: Maintaining high daily grooming standards means you’re always reasonably photo-ready without special preparation. This takes the stress out of unexpected photography and ensures all your holiday photos look good.
Product familiarity: Using consistent products you know perform well creates predictable results. You’ll know exactly how they photograph because you’ve seen the results repeatedly.
Style stability: Dramatic beard style changes photograph inconsistently as you learn how new styles work on camera. Maintaining relatively stable styling creates more consistent photographic results over time.
Seasonal adjustments: As seasons change, reassess your photo-preparation strategy. Winter’s dry air might demand different moisturizing approaches. Summer’s humidity might require different product holds. Adapt your photo-ready routine to current conditions.
Holiday photos become treasured memories that last decades. The extra effort ensuring your beard looks excellent in these images pays dividends every time you see those photos in future years. Your future self, looking at December 2025 photos in 2030, 2040, or 2060, will appreciate the care you took to document yourself at your best.
The camera is ready. Make sure your beard is too.